
The finer details
 As promised, finally a more in depth review of the Burda 7735 coat.
This fell into the “Young Fashion” category, so I immediately knew the fitting guide would be linked with teen sizes…i.e. smaller. I took careful note of finished garment sizes and measured individual pattern pieces to get a clear idea of how much wearing ease I would have, including allowance for heavy sweaters. I therefore cut the size 10, my only alterations were to shorten the length of specific pattern pieces through the bodice only. I left the sleeves at their original length as I have long limbs. I also changed the coat from double-breasted to single breasted.
My muslin led me to believe that this was going to be a snug fit.
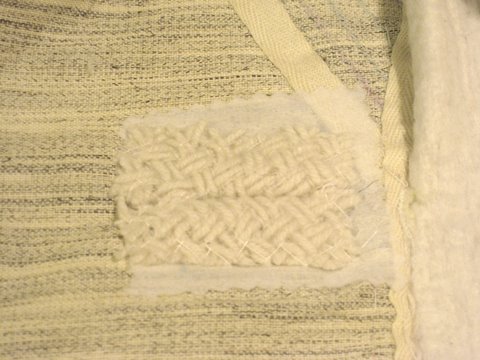
note to self: Basket weaves relax over time and so will the fit.
Fabric: A TDF cream-colored very loose basketweave. I chose to underline with a sale fabric from Joann’s for added warmth. Erica B. used a fusible underlining/interfacing for stability and now I see why. I fought at times to keep the cut edge from unraveling.
I used hair canvas initially in the collar (which was removed later) and in the lapel and hem. With the fashion fabric, underlining and hair canvas together, the collar was uber-stiff. Out came the scissors and I removed everything save the basketweave…much better but I lost some of that lovely construction from tailoring.
note to self: pay careful attention to interfacing , underlining and tailoring fabric selection or risk ending up with a hot mess!
 My reference manual was “The Classic Guide to Sewing The Perfect Jacket” which I read from cover to cover. It is a must for your sewing library.
All non-topstitched seams were sewn via catch-stitch to the underlining. Time consuming, but worth the effort.
 I deviated from the pattern when it came to the pockets. You know I can’t leave well -enough alone. I loved the pockets on a coat by
Sonya Rykiel and here is my attempt to duplicate the same.
It has a flap that’s tacked in the front, therefore the pocket lies open. I love the detail because I am infamous for jamming my hands into my pockets and loading them up with all kinds of mommi and vanity crud.
 The sleeves are a two pieces construction and set in. I am probably one of the rare few who don’t mind setting them in, but the jacket bible recommends using 3, not 2, rows of basting at the sleeve cap, for easing. OMG! Revelation. Just that extra row holds the easing better and ultimately made the process easier. The cuff is the icing on the cake because it’s simply a large flap the overlaps and looks so lovely.


 As for the button holes, I confess my initial trepidation. I was concerned with sewing a bound buttonhole and with such heavy fabric. Following the jacket bible, it worked like a charm. I thread traced the buttonhole placement and proceeded from there. The back of the buttonhole was interfaced and the welt, when brought to the interior, was catch-stitched to ensure that it lay flat.
 I scored these gorgeous buttons from G Street Fabrics and they required a fairly long shank to fit through the buttonhole with ease. I used one of my sewing tools for the front shank and another for the back shank. I also added reinforcement buttons to the back…freebies from my stash.
 The lining was made from a delicious olive green brocade from Joann’s and like all of it’s ilk, it frayed something fierce, but all raw edges were promptly serged. Burda gives nifty little instructions for the back pleat in the lining and following Tany’s lead, instead of feather stitching, I did a bit of machine embroidery. I also added piping of a lime green satin that I pressed flat. I threw in a hanging chain for the Ooo La La factor. I confess I did not hand sew the lining in. Bump that, I know when to get over myself and use electricity. Do I get any points for carefully slip-stitching the hems? 🙂
Which brings me to the hemming. It was rough going. Without going into detail, I managed a hem, but I plan on going to a tailor and let them redo it for me.
 As for Burda’s instruction…well done.
note to self: Burda can actually write instructions if they want a viable US market.
In the end, despite the persistent amount of work, this was an outstanding project to start the year. Yes…it did take that long, but I have a new coat! As for warmth, this garment is a beast! It is by far the warmest cloth coat I own. This was a true education in garment construction and I enjoyed the challenge.

I love all the details! Congrats on a gorgeous coat.
This is a truly gorgeous coat. You did such a great job with this. I appreciate all the detailed info you provided.
This looks fantastic!! Thanks so much for all the tips about the basketweave. I’ve got very similar coating in turquoise I’ve got set aside for a coat, but I was also wondering about whether to block fuse and if bound buttonholes would work with it as the welt (or if I needed to do them with the lining fabric or something). So this was very helpful, thanks!
Kudos… Clapping Hands.. You did a fabulous job and the coat and it is 2DF. Thanks for sharing the progress shots.
Dei .- congratulations on your coat. The end result is great. I understand your concern, as these tissues are difficult to sew. In the end, all elements of the coat are perfect, really.Thank you for adding to your list. Greetings from BarcelonaPaco
Absolutely gorgeous!
Lovely coat. You did a wonderful job. Love the bell-shaped sleeve. They and the large pockets make the coat. 🙂